How to Use ApowerPDF to Organize PDF Pages
1. Introduction
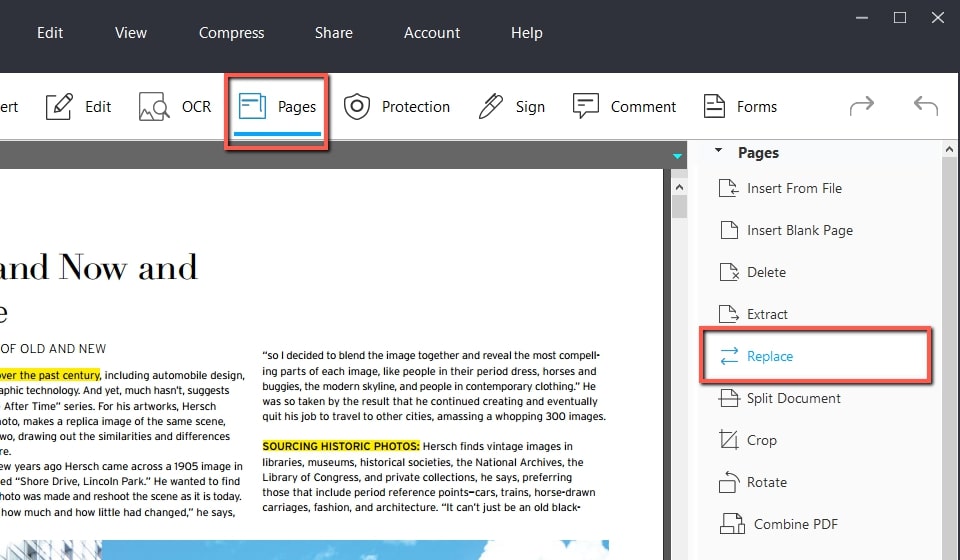
It’s available for organizing PDF pages in ApowerPDF. Open the software, and then click “Pages”, you will find the features to organize pages on the right side of the interface. The detailed steps for each feature are listed below.
2. Insert From File
Click “Pages” > “Insert Form File” button, and then select the file you wish to insert.
Here, you can choose the location where you want to insert the file in a pop-up window. You are able to select a detailed location like “before” or “after” a specific page.
3. Insert Blank Page
Click “Pages” > “Insert Blank Page” button. It allows you to choose the destination and the count of blank pages you want to insert.
4. Delete
Click “Pages” > “Delete” button. A pop-up window will appear. You are able to delete a specific page or consecutive pages in the file.
5. Extract
Click on “Pages” > “Extract” button. It allows you to extract a specific page or consecutive pages from the file. These 2 save modes are both available.
Tips:
If you want to edit the extracted page separately, click “Delete Pages After Extracting”. The software will automatically create a new PDF file to save the extracted pages. And the interface will jump directly to this new file so that you can directly edit it.
If you would like to “Extract Pages as Separate Files”, check it and select the location you want to save in the pop-up window.
6. Replace
Click on “Pages” > “Replace” button.
Choose a file you want to replace in the pop-up window. Set the page range of the current PDF file and replacement file.
Tips:
If there is only one page to be replaced, fill in both 2 “Replace pages” boxes with the same number of pages.
7. Split Document
In the split documents dialog box, the following 3 methods are available to split PDFs.
· Split document by “Number of pages” — You can set the number of pages to split the file. For example, for a 109-page document, if you set the “Max pages” to 10, the original document will be divided into 10 10-page documents and 1 9-page document.
· Split document by “File Size” — It’s available for splitting document according to file size you want.
· Split document by “Top-Level Bookmarks” — If the document includes bookmarks, create one document for every top-level bookmark.
Tips:
Click “Output Options…” tab, you are able to set target folder and name of the new split files directly.
Click “Apply to Multiple…” tab, you can select multiple files to split at once.
8. Crop
Click “Pages” > “Crop” button. Drag a rectangle of the area you want to preserve, and then double click the page.
In the crop dialog box, you are able to set margin controls, page range and whether save as a new file.
If you manually drag the border is not accurate, you can directly set the specific cropping parameters in “Margin Controls”. Besides adjusting CropBox, it’s also available for setting margin controls of ArtBox, TrimBox and BleedBox. You can preview the cropping effect on the right side of the pop-up window.
ApowerPDF supports to crop a certain page or continuous pages. You can set the page range at the bottom left of the pop-up.
Tips:
The default setting is to save as a new file in the same directory as the original file.
9. Rotate
Click “Pages” > “Rotate” button. In the rotate pages dialog box, it supports setting rotating direction, page range and rotating landscape or portrait pages.
10. Combine PDF
Click “Pages” > “Combine” button or just click “Combine PDF” on home page.
Click the “Add Files” button at the top left of the pop-up.
Then select the PDF files you want to merge by clicking “Add Files” or “Add Folders”.
After adding all the files, you can choose one and adjust the order by clicking “Move Up” or “Move down”. And then click “OK” to save.
Tips:
If you have already opened a PDF file, and you want to add another file. Remember to add not only the files you need but also the file you open now.
Ask Apowersoft Support
Still get confused or have more suggestions? Please email us, and we will reply within 24 hours.

Leave a Comment