
Photos are the heart of the Instagram story, but GIFs can help to give your content some soul. There is no denying that GIFs on Instagram are seriously starting to trend due to their features, like the small file size, fast loading time, and the fact that they are easy-to-spread over the Internet. But how to make gif for Instagram story to wow your Instagram followers and draw attention to your brand? Here we have discussed some of the best methods you can rely on to create Instagram story GIFs on different platforms.
How to Create GIF for Instagram
Canva (Web)
Canva is a web tool used for creating professional and amazing quality graphic designs. With the help of this platform, you can make a stunning GIF, regardless of whether you are a professional or a non-designer. It supports a drag-and-drop format, which simplifies the process of making a GIF for Instagram. Take note that you have to create a subscription on Canva in order to use it. It has a free subscription format. For a better effect, you’d be wiser to choose a monthly subscription. Here are some simple instructions for you so that you can use this GIF maker for Instagram.
- Open Canva with your preferred browser and log in with your email and password.
- Click “Create a design” and pick your preferred social post. In this case, it will be “Instagram Post”.
![add watermark Canva]()
- Click “Uploads” to upload the images you want to use. Then drag the image to the right-side area in which you can crop the image to your preferred size.
![upload image to Canva]()
- After this, you can use the filter, add text and enjoy the other tools it offers.
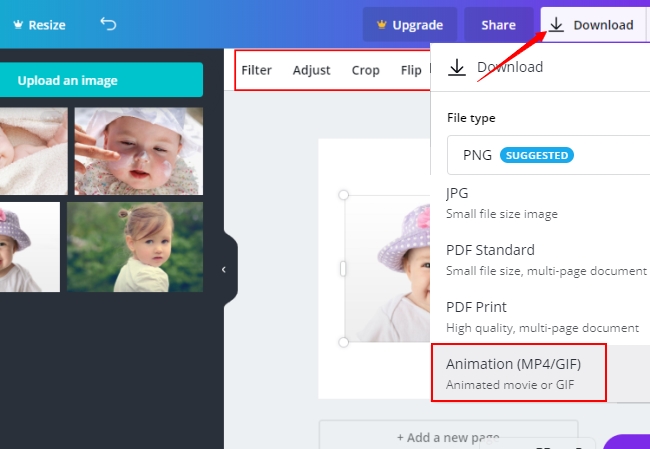
- Once you have completed the GIF, click on “Download” and choose “Animation (MP4/GIF)” to save it to your computer.
![adjust gif effect]()
Photoshop (Desktop)
Photoshop is a well-known photo editor. It contains many features for processing photos. Although there are quite a lot of guides and video tutorials available, it still requires its users to have some editing skills. If you want to use PhotoShop to create GIF for Instagram, we have provided a detailed step-by-step guide for you.
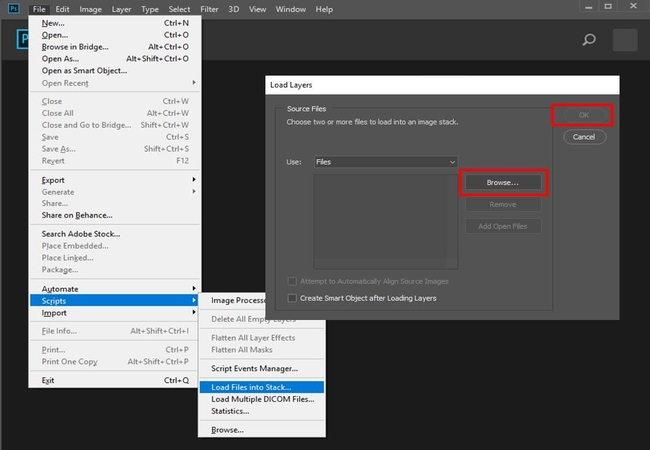
- Open Photoshop, then drag your picture into the program. Then go to File > Scripts > Load Files into Stack. Select the “Browse” button in the open window and choose the images that you want to use, and then click “OK”.
![choose the images]()
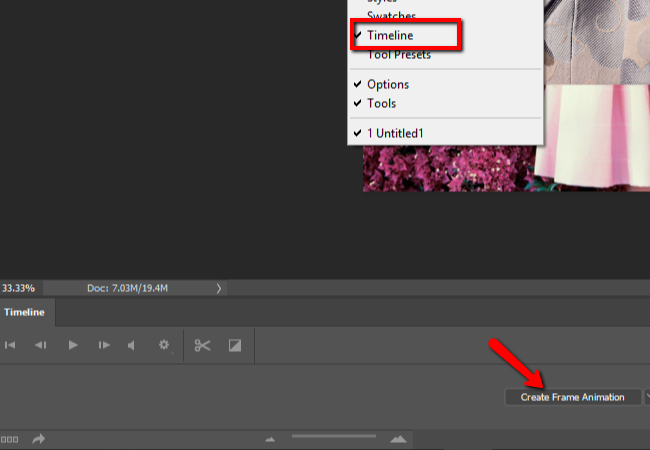
- After you’ve done that, the layers will show up on the right-hand side. Then you need to go to the top of the screen and click Window > Timeline, and you’ll see the timeline window has been opened at the bottom. Then click the “Create Frame Animation” button in the middle and one of the images will show up in the timeline.
![timeline window]()
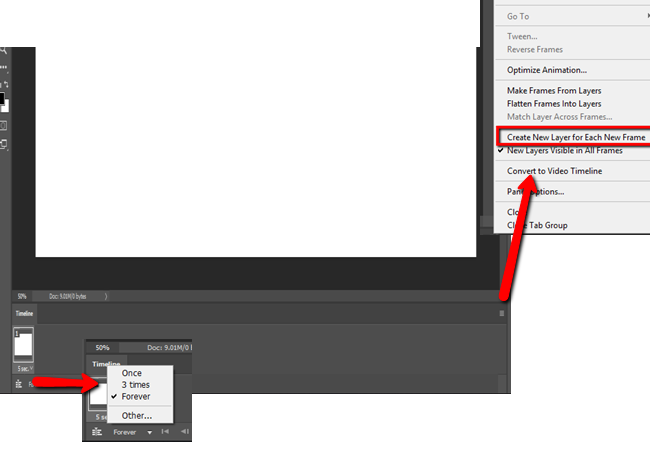
- Click the menu button from the top right corner of the timeline window, choose “Make Frames From Layers” from the choices. This will convert all layers in the Layers panel into animation frames.
- Preview the animation. Click the little arrow below each image and choose “Once”, “3 times”, “Forever” to set how your animation loops.
![make frames and layers]()
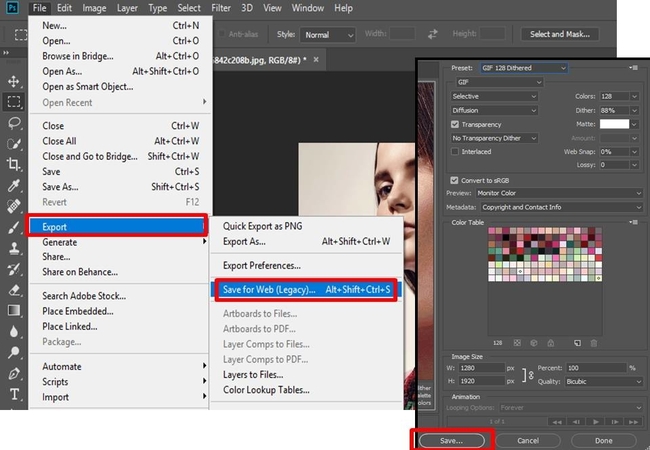
- To save your GIF, click “File” > “Export” > “Save for Web (Legacy)”. In the pop-up window, choose “GIF 128 Dithered” from “Preset”, “256” from “Color”, choose the appropriate width and height for your Instagram post in the “Image Size” section, and select “Forever” for the Looping option.
![instagram post]()
Congratulations! You’ve successfully made a GIF for Instagram.
Giphy Cam App (Mobile app)
If you are looking for a great GIF app for Instagram, Giphy Cam is one of the best apps that you can use. If you often make GIFs, you would have already known about Giphy, the well-known online database and search engine often used in creating GIFs. Giphy Cam is its mobile version. Currently, it has both an iOS and Android version. Each of them has a high rating in their respective stores. Giphy Cam allows users to record video or convert their filmed video to a GIF format, and it also allows them to add filters/special FX/text to the GIF. It integrates well with social media, which makes it very easy to share your GIFs on Instagram, Twitter, Facebook Messenger, etc. It also supports a function which allows you to save the GIF to your gallery for later use. Please check out our simple tutorials for both the Android and iOS version tolearn how to create GIF for Instagram.
For Android Users:
- Get the app from the Google Play Store on your Android smartphone.
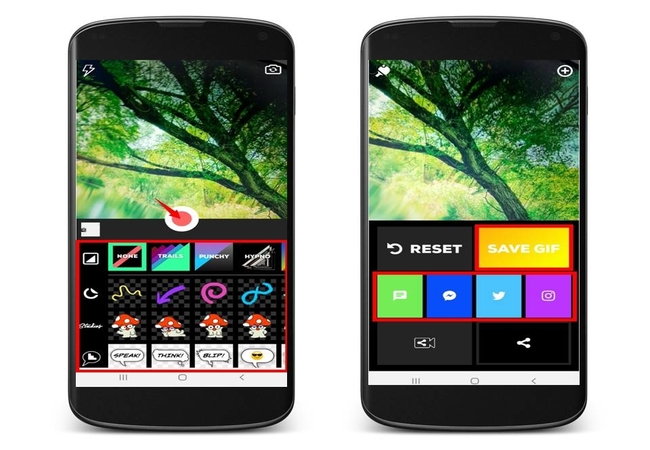
- Open it, then press and hold the red button to record a GIF. Or tap the button to shoot a GIF in burst mode.
- After this , you can add text, filters and special effects to enhance your GIF file.
- Once completed, you can share it directly to Instagram. Alternatively, you can also save it to your phone gallery and upload it later.
![directly share]()
For iOS Users:
- Get this GIF app for Instagram from the App Store on your iDevice.
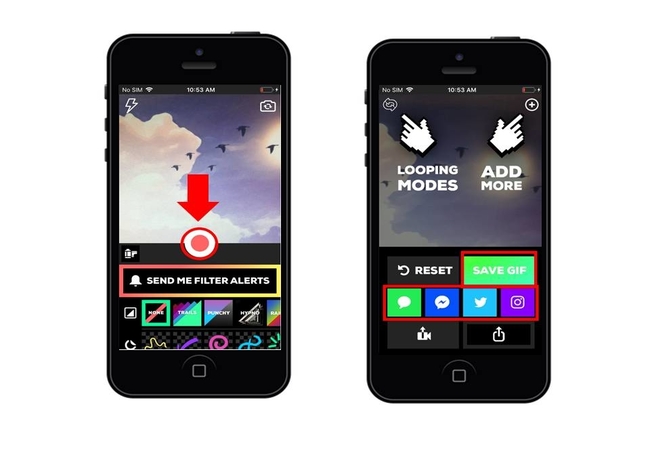
- Open the app, press and hold the Red button to record a GIF, or import an image or video from your camera roll as the base materials for the GIF.
- Similarly, you can add filters, special effects and texts for your brand in the GIF.
- When completed, share the GIF to your Instagram, or save it first and then manually upload it to Instagram later.
![share the gif to your Instagram]()
Conclusion
GIFs have become increasingly popular in the social media industry. There are hundreds and thousands of websites, programs and apps out there. These three solutions are the best of them on a variety of different platforms. If you have other suggestions regarding making a GIF for Instagram, do not hesitate to share your ideas here.



Leave a Comment