Apowersoft Screen Capture Pro is a powerful screen capture tool that allows you to take/edit/upload/share screenshot, as well as record screen. This guide is created for helping you learn how to use this application. No matter how many questions you may have, you can find the answers here.
How to Use Apowersoft Screen Capture Pro
1
Take Snapshot
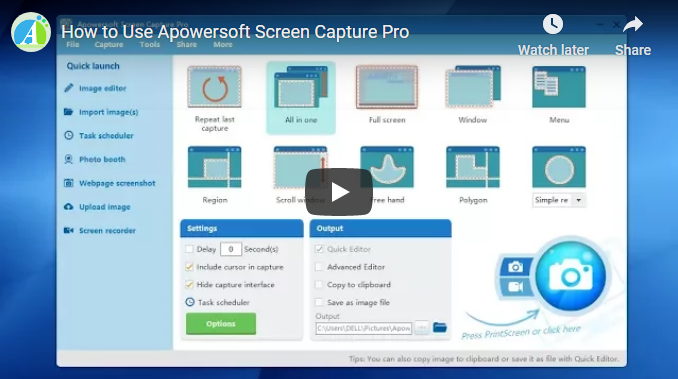
This screenshot software provides more than 10 capturing modes, including All-in-one, Full screen, Region, Window, Menu, Free hand, etc. You choose the desirable one based on your requirements.
i
Select Capture Mode

- All in one: this screenshot mode allows you to flexibly capture a region on the screen.
- Full Screen: this mode enables you to snapshot the full screen with just one click.
- Window: upon the selection of this mode, just move your mouse to the active window you desire to capture and then click the window to capture it.
- Menu: this mode enables you to snapshot in 5-second delay as default. Therefore, you could have time to present the menu. The screenshot of the menu will be captured automatically after 5 seconds.
- Region: this mode is for you to capture screen with a fixed region. Once, you’ve selected it, you can click your mouse to capture a screenshot. While you can also customize the width and height of the region by right clicking the mouse.
- Scroll window: this mode is for capturing all contents in a scrolling window or webpage, even they are beyond the screen.
- Free hand: Using free hand capture mode, you can create irregularly shaped screenshots as you wish.
- Polygon: this mode is for capturing a special polygon area on your screen, just click the screen to set the first point, then continue setting other points according to your need, double-click to confirm the screenshot.
ii
Configure Settings
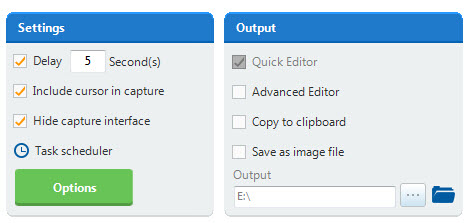
Before taking screenshot, you’re allowed to select the desirable output and configure other settings.
Choose Output Directory
As for the output, four possible outputs are available for you to choose from.
Delay in Capture
Besides, you can also set a delay time in capture if needed. This feature is mainly for you to capture pop-up menus and tooltips.
Include Cursor
If you want to capture your mouse cursor, you can check the “Include cursor in capture” in the “Settings”. Then, press the hotkey “Print Screen” or “Ctrl + Q” to activate the screenshot. After that, the cursor will appear on the screen, and you can take a screenshot with the cursor in it.
Set DPI for Screenshots
This program allows you to customize the DPI for the screenshots. You can do it by going to “Tools” > “Options” > “Screenshot” and customize the DPI from 96 to 600. The higher the DPI is, the clearer the screenshot will be.

Once these settings are done, you can check the following part to start capturing.
iii
Start Making a Screenshot
Press the print screen key or click the camera icon in the bottom right of the interface, then your cursor will turn into a blue reticle. Then, click, hold and drag your mouse to select a region, and release the mouse to confirm the screenshot.
iv
Capture a Photo from Webcam
You can also take a photo from your webcam. Just click the “Photo booth” on the left “Quick launch” pane. A window will pop up, you can click “Take a photo” on the right bottom of this window to capture a picture from the webcam.

2
Screenshot Editing
Apowersoft Screen Capture Pro is of great help when it comes to editing screenshots. It integrates abundant options to polish screenshots easily. In order to access the Editor function, you can press the “Image editor” button located in the “Quick Launch” panel on the left. If you want to edit the screenshot in this editor immediately after capturing it, you need to select the “Advanced Editor” option on starter interface, then, capture a snapshot and the screenshot will be automatically presented in the advanced image editor.

i
Adjust the Screenshot
Once the editor is opened, you can see the image loaded in the large window portion located under the toolbar.
One of the first modifications that you might want to do is to resize it. Just press the “Home” menu, then select the “Resize” button. You can resize the image with a certain percentage or set a specific width and height for it depending on your needs.
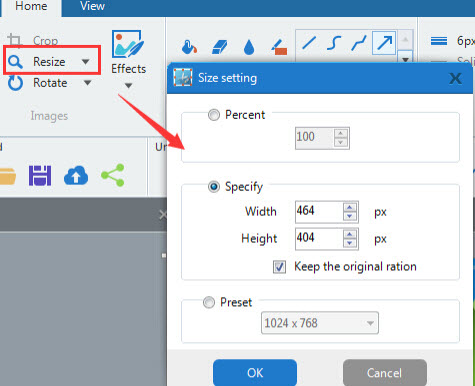
To rotate the screenshot, you have to press the “Rotate” button and then select the direction which can be either clockwise or counterclockwise. You can also perform a horizontal and vertical flip.
Note: In addition to screenshots, you can also open any images in this image editor. You can do that by pressing the “File” menu and then choosing “Open”. After that, select the image(s) that you want to edit.
ii
Add Annotations to Screenshot
With the options in the “Tools” section, you’re able to annotate your image with a variety of shapes, highlights and texts in different styles. You can also blur or pixelate some parts on the screenshot to cover private information.
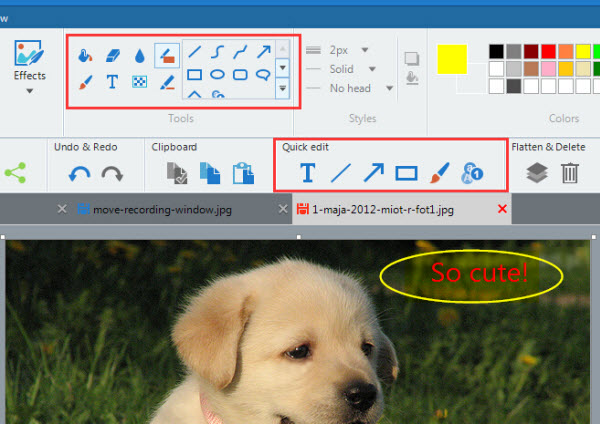
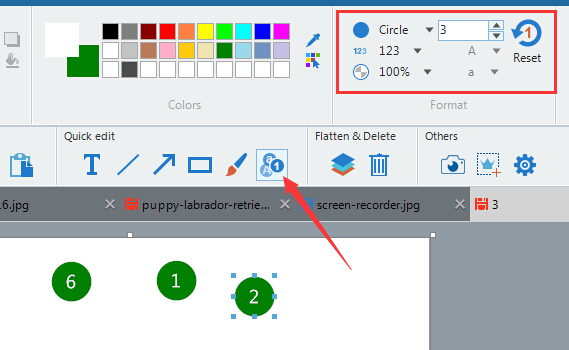
If you want to add some step marks on the screenshot, you can use the “Step” function in the image editor. This option helps you add numbers on the image quickly. It also enables you to customize the style for the numbers, such as color, opacity, etc.
iii
Add Effects to Screenshot
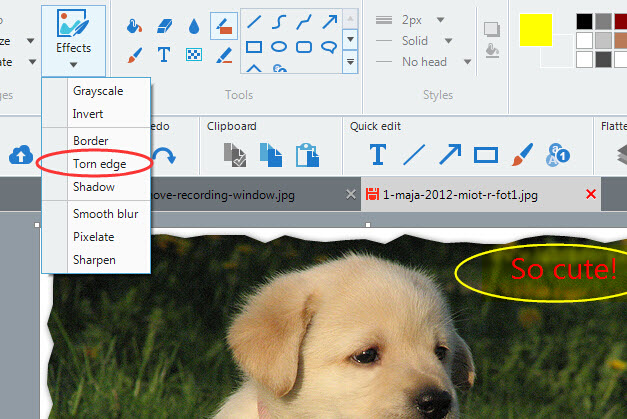
The advanced editor comes with a variety of effects that you can add to your images. These include grayscale, invert, pixelate, torn edge, sharpen and many more. You can access them from the “Home” menu.
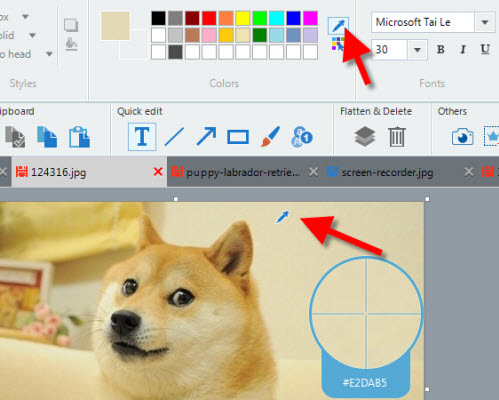
In the “Color” section you can select the color for arrows, lines, texts, etc. This also allows you to select colors from other images. This will help you get the exact color you want.
In the “Font” section, you’re able to select the desired fonts for texts. You can choose the size for the texts, italicize and underline them or set them in bold.
iv
Change Image View
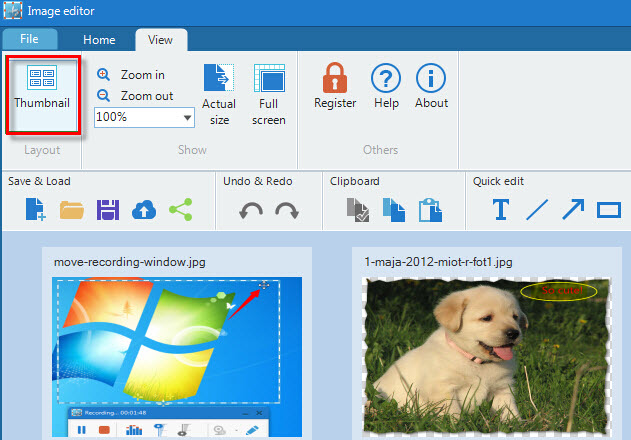
From the “View” menu you have the opportunity to change the way you view all files you work on. By pressing the “Thumbnail” button, you will be able to view all the images within one interface so that you can easily select the one you want to edit.
In the “Show” section of the “View” menu you can zoom in or out of the image, or if you want you can view it in full-screen or its actual size by pressing the adjacent buttons. You have multiple predetermined zoom functions to choose from 25% to 800%.
v
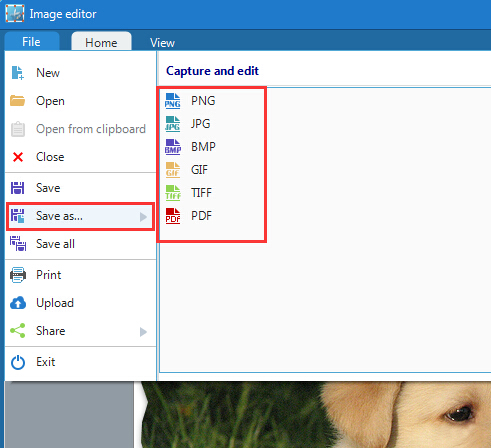
Save Image after Editing
When the editing process is completed, you can go to “File” menu and choose the “Save” function. This tool provides various formats for images, including JPG, BMP, PNG, GIF, TIFF and PDF.
From the “File” menu you can also perform a quick screenshot capture which will then be automatically integrated into the application for editing.

That is the guide for editing screenshots and images. Every function included within the program is very easy to perform, and by following the guideline, you will be able to know where to access each function and how to polish your screenshots and images.
3
Share Screenshots
Once you’ve done with the screenshot, you can choose to upload it to the free Cloud or share it to your social networks so that you can always get access to it as long as you are online.
i
Upload Your Screenshot
ii
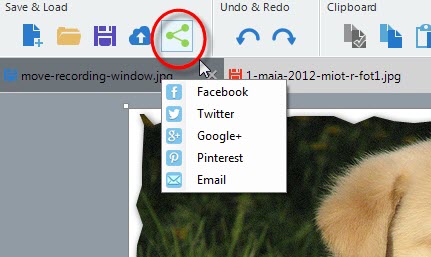
Share Your Screenshot
Click the “Share” button on “Load & Save” column or under “File”. There will be five options for you to choose: Facebook, Twitter, Google +, Pinterest and Email. If you share it to your social networks, the screenshot will be uploaded to the Cloud first and then be delivered to the social networks via a link. If you want to email it, the screenshot will be directly sent as an attachment.
4
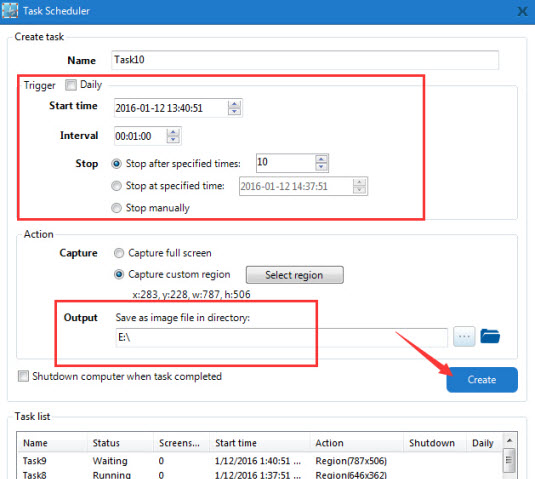
Create Schedule Task
Apowersoft Screen Capture Pro comes with a “Task scheduler” for taking screenshots automatically. You can access this function by clicking “Task scheduler” located in Quick launch pane on the left.

To create a task schedule, you need to give the task a name, set its start time, interval and stop manners. You can choose to capture full screen or a specific region. The output directory for storing screenshots is also customizable. After all the settings, just hit “Create” and “OK” to confirm the schedule. Screenshots will be taken automatically according to your schedule, you can find them by going to the directory you’ve set for them.
5
Screen Recording
Apowersoft Screen Capture Pro added another powerful function: Screen recorder. This option enables you to record anything on your screen as videos. You can access it by clicking the “Screen recorder” button on the “Quick launch” pane. Alternatively, you can also have a quick access to it by clicking on the recorder icon on the right bottom of the interface.

After that, you will be taken to the screen recorder interface. There are plenty of choices for you to make a perfect video.
i
Settings before recording
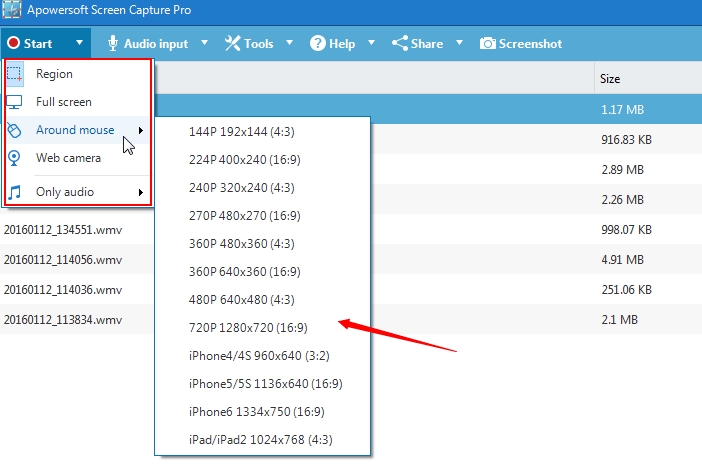
a. Recording modes
This recorder allows you to record screen in different modes:
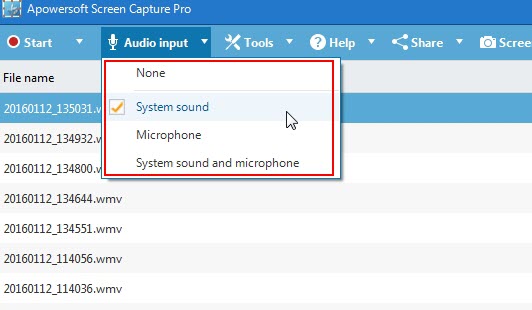
b. Audio input
You can choose which audio to be recorded in the video:
You are able to do other advanced settings to meet some of your particular requirements. Click “Tools” on the interface, then choose “Options”, another window will then pop up. In this window, there are multiple recording settings for you to produce high-quality screencasts.
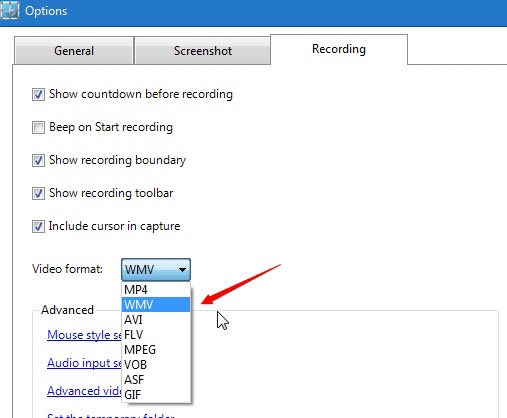
c. Video format
You are able to select a format for the video before recording. And there are various formats for you to choose: MP4, WMV, AVI, MOV, FLV, etc.
d. Mouse style settings
Mouse style is also available to change for the recording. Apowersoft Screen Capture Pro allows you to record screen with mouse cursor movements, and highlight the mouse clicks as well.

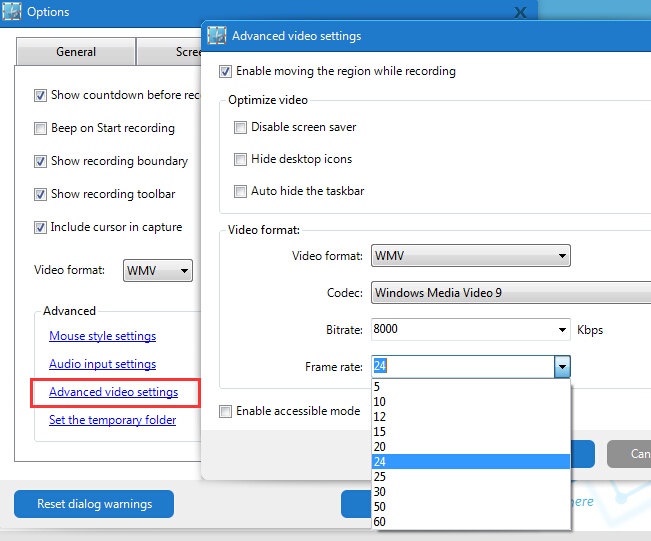
e. Others
You can also adjust the Codec, Bitrate and Frame rate for the screencast.
ii
Make a Screencast
a. Choose a recording mode to start a video recording
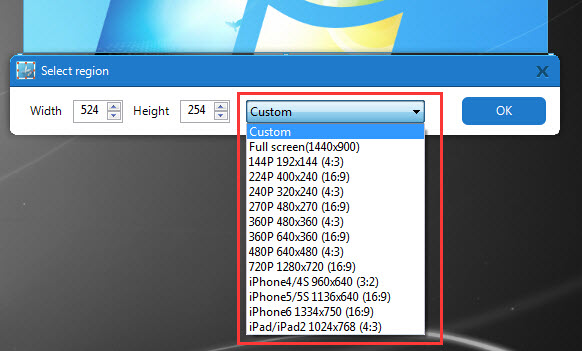
For instance, if you choose “Region”, then your mouse cursor will turn into a crosshair. Click, hold and drag your mouse to select a recording area. Release your mouse to confirm it. A preview of the recording area will show up. You can also choose a resolution for the screencast on this interface. Lastly, click “OK” to go. After the countdown of 3, 2, 1, the recording begins.
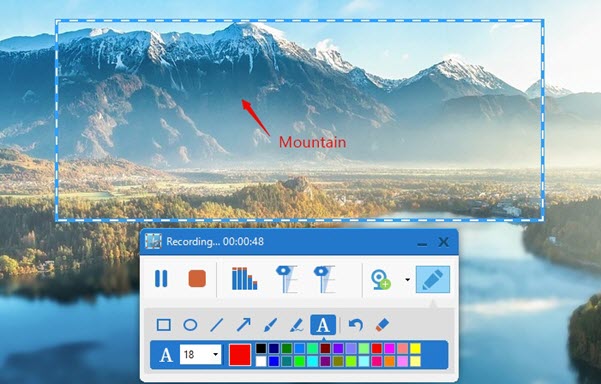
b. Edit the screencast during recording
During the recording, you are able to annotate the video with lines, circles, arrows, texts by clicking the pen icon on the toolbar. These annotation additions will not affect the fluency of your video. If you are recording a movie, the frames of the movie will keep moving when you are adding annotations to the screen.
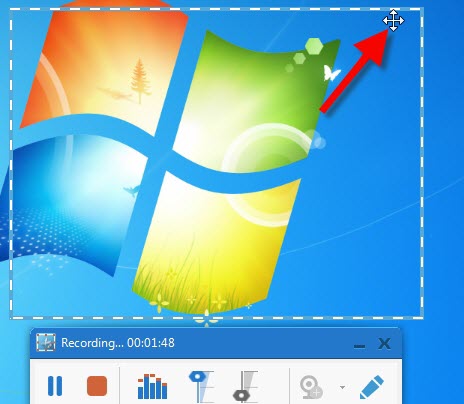
c. Move the recording area during recording
Apowersoft Screen Capture Pro allows you to move the recording region during recording. Just move your mouse the margin of the recording window. When the cursor turns into pointer with four arrows, click, hold and drag the recording window to the place you want to record into the video.
d. Save screencast
At last, to finish the screencast, just click the red stop button. The screencast will appear on the recording list and also be saved to your local disk automatically.
Tips: When a screencast is created, you can playback, rename, remove, delete or convert it as you like.
Leave a Comment